Remove reserved disk-space for root on ext4

When you add a new disk and mount and format it, about 5% is reserved for root. So if you have a big disk that could be quite the amount of space “lost”.  The general explanation seems to be that fragmentation isn’t handled very well when the disk is almost full. If you would execute a process doing a lot of file open/close operation it would be very slow. 
Also, some important root processes could be using this space. But, depending on what you are using a disk for  it would not be that important. On all my backup disks for example I have removed the reserved disk space as I will do a better use of it than the OS.

To remove the reserved disk-space just use the following command:  
Use “df -Th” to check how much space you have before and after and you’ll see the difference.

 tune2fs -m 0 /dev/sda1

Cheers
/jima

How to make Plex media server available from remote without having an account through apache

Hello there. 

Plex Media Server

I use Plex (plex.tv). It’s a fantastic tool to manage your videos and movies. You stream anything to anything with a modern browser.  The thing is, if you want to be able to share your stuff through the Internet and see a film you’ve got at a friends house, you need to create an online account on the Plex home page. I’m not to fond of creating accounts sharing what I have. 

There are several ways you can reach your plex meda server from the outside, but in this post we’re gonna use apache (you need to install it if you don’t already have it installed).  In my home network I have my own web server (if you are reading this you’re on it right now ;).  Also on the same network I have got my own proper Ubuntu server with Plex installed.

How do we connect the two services? Apache has got this neat thing called ProxyPass and ProxyPassReversed. So what I did was the following:

  • Create a subdomain
  • Create a .conf file for apache (see below):
  • sudo vim /etc/apache2/sites-available/subdomain.jima.cat.conf
  • Then “cd /etc/apache2/sites-enabled” and make a link:
  • sudo ln -s ../sites-available/subdomain.jima.cat.conf subdomain.jima.cat.conf
  • Restart apache: sudo service apache2 restart

This is the .conf file. You need to change all marked in bold to your own values. The part in blue is only needed if you would like some sort of protection. This makes it impossible for anyone to enter your site without a proper username and password. You can see how to create the password file here.

<VirtualHost *:80>
   ServerName "subdomain.domainname.com:80"
   ServerAdmin "admin@domainname.com"
   ProxyPass / http://192.168.2.51:32400/
   ProxyPassReverse / http://192.168.2.51:32400/

   CustomLog /var/www/vhosts/domainname.com/logs/subdomain.access_log common
   ErrorLog "/var/www/vhosts/domainname.com/logs/subdomain.error_log"

   ProxyPreserveHost on
   <Proxy *>
      AuthType Basic
      AuthName "password protected..."
      AuthUserFile "/var/www/vhosts/domainname.com/.htpasswd"
      Require valid-user
   </Proxy>

</VirtualHost>

Now try from the outside: http://subdomain.domainname.com/web

Cheers
/jima

Convert a raw dd image to VMDK (vmware)

vmware

This site is run on my very own web server. I keep backups (of course) with the help of the magic tools rsync and tar. But I also like to make an image of the operating system disc with the help of dd. When dd is done creating the raw image file I sometimes like to create a test system, a replica of the production environment. It’s fun to be able to play around knowing you can’t destroy anything, because if you do you just start over. I use vmware  for my playground test system.

To easily convert a dd raw image to a vmware vmdk hard disk file you first must install qemu:

sudo apt-get install qemu

With qemu you can do a lot of things and convert from many file formats, but in this post we’ll only show how to convert to vmdk, but you should really have a look round the qemu help for more information. 

Now how to convert:

qemu-img convert -pO vmdk /path/disk.raw /path/hard_disk.vmdk

The commands:

-p Progress. Not necessary but its nice to see when the conversion will be done.
-O

Output format. We want the output file in this case to be a vmdk file.

Valid output formats: (copied from here)

vmdk VMware
raw (default) the raw format is a plain binary image of the disc image, and is very portable.
cloop Compressed Loop format, mainly used for reading Knoppix and similar live CD image formats
cow copy-on-write format, supported for historical reasons only
qcow the old QEMU copy-on-write format, supported for historical reasons
qcow2 QEMU copy-on-write format with a range of special features, including the ability to take multiple snapshots, smaller images on filesystems that don’t support sparse files, optional AES encryption, and optional zlib compression
vdl VirtualBox
vhdx Hyper-V compatible image format, for exchanging images with Hyper-V 2012 or later.
vpc Hyper-V legacy image format, for exchanging images with Hyper-V 2008 / Virtual PC.


That’s it. You now have a new hard disk drive ready to be used by vmware

Cheers
/jima

How to Change the System Proxy Settings via the Terminal in Linux Mint (ubuntu)

I use Linux Mint and I frequently change my proxy settings. This is because my wonderful daughter like to watch TV programs from Sweden and I need to access the web sites through a Swedish IP address. It gets kinda boring after a while having to enter the proxy settings each time so I created a little script to toggle the proxy settings.

The part that adds the proxy:
The parts in bold are the important stuff. That should be the value to your own proxy.

 gsettings set org.gnome.system.proxy.socks host 'localhost'
 gsettings set org.gnome.system.proxy.socks port 9997
 gsettings set org.gnome.system.proxy mode 'manual'

The part that disable the proxy:

 gsettings set org.gnome.system.proxy mode 'none'

Works like a charm and there is no need to enter through the network proxy GUI every time.

Please note that you need to restart your terminal windows for the change to take affect in them (do export | grep -i proxy and change the variables if you don’t want to restart the terminal window(s))

 
Cheers
/jima

How to change the default position of ssh/authorized_keys file

authorized keys

Sometimes you might need to change the default position of the authorized_keys file. You might have an encrypted home directory (unless you have another session already opened, you would never enter automagically since the key file would be unreachable).

You could create a folder:

/etc/ssh/authorized_keys

 And in this folder create a new folder for each user containing their authorized_keys file. You need to set the owner and group of the folder to the user as well.

Then you need to edit /etc/ssh/sshd_config with your favorite editor and find or add the line AuthorizedKeysFile:

AuthorizedKeysFile  %h/.ssh/authorized_keys /etc/ssh/authorized_keys/%u/authorized_keys
(NOTE: it should all be on one line)

This will make the ssh server first to look at the usual location /home/<user>/.ssh/ and if not found or accessible it will continue to look in the /etc/ssh/authorized_keys/<user> folder. 

After this modification you need to restart the ssh server:

sudo service ssh restart

That’s all folks!

Cheers
/jima 

Password Protect a Directory Using .htaccess

Hello there. Today we’re gonna look on how to password protect a specific folder with help of apache and it’s fantastic .htaccess file.

Lock Folder

This is done in a moment. Start by entering the folder you want to protect. Open the .htaccess file with your favorite editor and type in the following:

AuthType Basic
AuthName "restricted area"
AuthUserFile /var/www/vhosts/my-domian.com/httpdocs/folder/.htpasswd
require valid-user

AuthName is a text that will appear when trying to enter the folder and you can type just anything.
AuthUserFile The path to your .htpasswd file. It’s recommended to put this file in the same folder you want to protect. The .htaccess and .htpasswd files should be protected by the apache server by default so no user can download those two files.

If you don’t know your complete AuthUserFile path you could create a php file with “phpinfo();” in it. This will show you the correct path to your html folder.

Ok. Now we need to create the .htpasswd file. The first time you need to add the “-c” option

htpasswd -c .htpasswd username

You will now be asked to type in a password. Your are done. Now try to enter the folder. 
To add more user you do the same command without the -c option (it means create and will give you an error if the file already exist)

htpasswd .htpasswd username2


Cheers
/jima

Enable PHP errors while being executed

PHP errors. 

This one is mostly for copy paste purpose. A quick way for myself to find it and include it while programming ;P

ini_set('display_errors', 1);
ini_set('display_startup_errors', 1);
error_reporting(E_ALL);

This is a simple and quick way of viewing errors without having to change the php.ini configuration file.

You must keep in mind though that this won’t show errors due to syntactically incorrect scripts (the parser errors). This is because PHP uses the Zend parser which is executed before the script itself, so since these ini settings has not yet been executed, parse errors won’t be displayed (but logged).
To have them displayed too then you are forced to set the display_errors and error_reporting parameters in the php.ini file.

Cheers
/jima

Login to a Linux server using SSH without password

SSH SSH, Secure SHell is a fantastic piece of software. It can do many many things to help you secure data transfer. Though when entering to the very same servers over and over and over it can be a bit of a hazard having to type in that very same password just as many times. Now you will learn how to skip that part making it so much easier to use not only ssh but other commands like rsync and scp.

First we need to create a key on our computer from where we want to connect to the server.  Older releases of ubuntu need you to specify the command as on the green line, while on newer releases this is the default value and there is no need to specify any parameters:

: ssh-keygen

: ssh-keygen -t rsa

The key created will have a length of 2048 bits for SSH protocol version 2. This is a very secure key length. As it seams (googling the web) it will take many many years in order to be able to crack a key of this length. Though Debian recommends a length of 4096 bits. This is easily done by adding the -b option like this:

ssh-keygen -t rsa -b 4096

Adding more bits makes the key bigger, more CPU used, more battery drain etc… depending on devices used you might consider what’s best for you. Though if it’s a key that you are planning to use on a public server for many a year to come, 4096 is by far the safer choice. When executing the program you will be asked two things

  1. Where to save the key
  2. To set a password

Just press enter and choose the default path on the first step. In this way ssh will always know where to find your key,. About setting a password: Just press enter and leave it blank, if not, you’ll be asked to type a password every time you use this key.  This is great when you’re entering really secure systems. Keys are always stronger than passwords and adding a password to the key itself helps protect even more against someone stealing your private key. I myself usually don’t use an extra password since I believe my private key are sufficiently safe. Anyway, after executing the command you will have something like this on your screen:
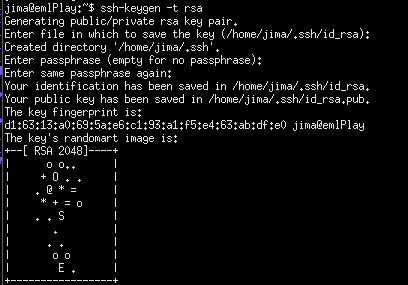
ssh-keygen-create-rsa-keys

The privet key is yours to keep safe. Never to be given to anyone. The public key however, is to be copied to the server/s you want to connect to.
The key files was saved in your home directory under a folder called “.ssh” and the private key is called “id_rsa” and the public key “id_rsa.pub”.

Here are a couple of options on how to copy your pubic key onto the server.

: ssh-copy-id <user>@<server>
You will be asked for your password on the server and that's it.

OR

: cat ~/.ssh/id_rsa.pub | ssh <user>@<server> 'mkdir -p ~/.ssh && cat >>~/.ssh/authorized_keys'
Create directory if not exist and create/append the key file.

If this doesn’t work make sure the .ssh folder has 700 permissions and that the user and group is the very one you are trying to login with. The authorized_keys file must have 600 permissions.


Cheers
/jima


mate-settings-daemon CPU 100%

mate-settings-daemon
Linux Mint

Found an annoying error on Linux Mint v17.1 ‘Rebecca’ MATE 64-bit. The CPU went up to 100% with a process called ‘mate-settings-daemon‘.

With a little help from strace it was some privileges problems in the ~/.cache folder.  One of the folders (dconf) had changed user from my own to root and I have no idea of how that could have happened. Anyway, did the following:

sudo chown -R <username>:<username> ~/.conf 
sudo pkill -9 -f mate-settings-daemon

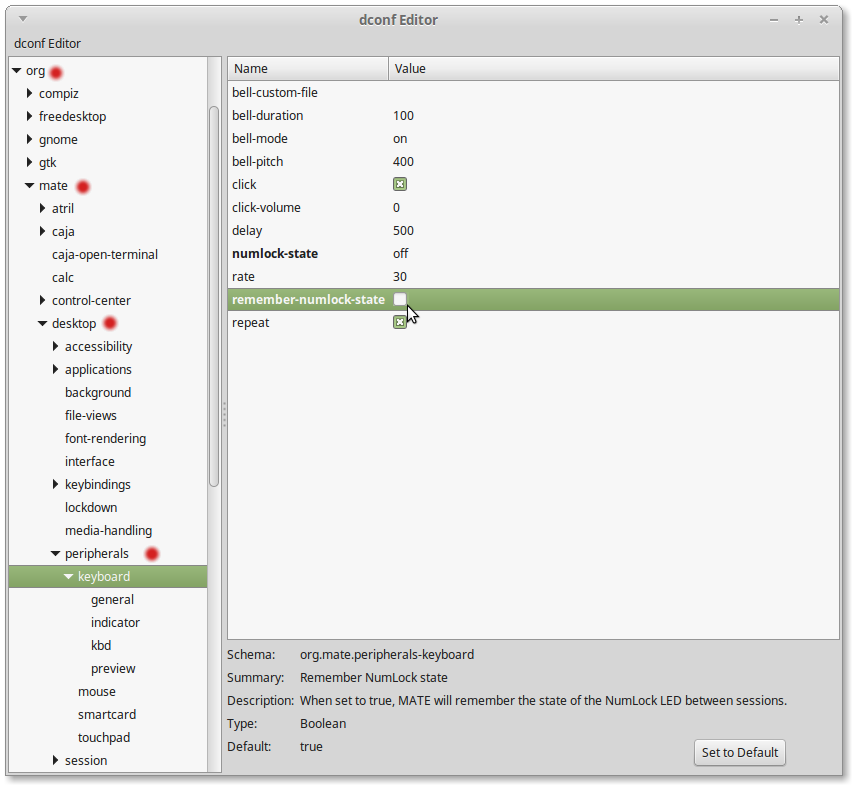
After that I also had to uncheck the “remember-numlock-state” setting with the “dconf-editor

dconf-editor


That seems to have done the trick.

Cheers
/jima

Convert flac to mp3 on the ubuntu command line

Hi again, The flac format is great. Though huge and not always supported by some MP3 players. Here is a quick way of converting flac to mp3. First lets download the required software:

sudo apt-get install flac lame

It works also on MAC, but you need to use brew install instead.

Then cd into the folder of origin and do this:

for f in *.flac; do flac -cd "$f" | lame -b 320 - "${f%.*}".mp3; done

So what does it mean? Well, the for is for recursively go through the current folder and get the flac files one by one

-c (flac) Write to stdout
-d (flac) Decode file 
-b (lame) The bitrate to use when saving as mp3
(lame) In this case it means read data from stdin


Though if you convert files regularly a script or alias might be to consider. With this alias you just cd into the folder and type flac2mp3.

alias flac2mp3='for f in *.flac; do flac -cd "$f" | lame -b 320 - "${f%.*}".mp3; done'


Cheers
/jima

Disallow robots from indexing your site – robots.txt

About “robots.txt“. robots.txt When you got a folder or a complete site even that you don’t want to be indexed and searchable on on Google or Bing, you can easily do this by creating a robots.txt file and put it at the top (root) folder of your site. When a robot enters your site it will first of all read this simple text file and index only what you want it to index. Though a warning, you have to keep in mind, that this will only be respected by good robots. There are people making their own robots to find mails, images, addresses or whatever that would not even read it. Anyway, some robot stuff: Disallow ALL:

User-agent: *
Disallow: /

Allow ALL:

User-agent: *
Disallow:

Exclude some folders for ALL robots:

User-agent: *
Disallow: /documents.html
Disallow: /misc.php
Disallow: /cgi-bin/ 
Disallow: /private/

Allow only Google:

User-agent: Googlebot
Disallow:

User-agent: *
Disallow: /

 Allow the bingbot access to the private section:

User-agent: *
Disallow: /private/

User-agent: bingbot
Disallow:

 Well, there you go, a few useful robots.txt examples… Cheers /jima

Watch TV online from abroad with SSH

NOTE: These instructions are for Linux.

Watch TV from any Country

Are you traveling a lot? You might be living in another country. The problem is still the same, you would like to see those TV programs from your home country but can’t since you’re getting that annoying message that you don’t have a local IP address making it impossible to watch anything. The hard part can be to have an available computer or server where to connect. A cheap way is to buy and configure a raspberry pi and leave it with at a friends house. They consume hardly anything so it won’t affect the electricity bill. Anyway, lets get started shall we. First of all, we need to use SSH to connect to the server and set up a dynamic link (SOCKS5) to a local port on our own computer. This is done like this:

ssh -f -N -D localhost:9999 user@ssh-server.com -p 22
-f Start in the background. Using this option lets you continue controlling the terminal window. (not necessary though)
-N Don’t start a shell (we don’t need one).  You could leave this option out if you are planning to also work on the remote server through a shell
-D From the manual:  Specifies a local “dynamic” application-level port forwarding. This works by allocating a socket to listen to port on the local side, optionally bound to the specified bind_address. Whenever a connection is made to this port, the connection is forwarded over the secure channel, and the application protocol is then used to determine where to connect to from the remote machine.So in this case, we specified localhost (our own computer) and port number 9999 (you can specify the port you want)
-p The default port is already 22. It’s just added to show how you can specify which port to connect to if the ssh server your are connecting to is using a non standard port number.

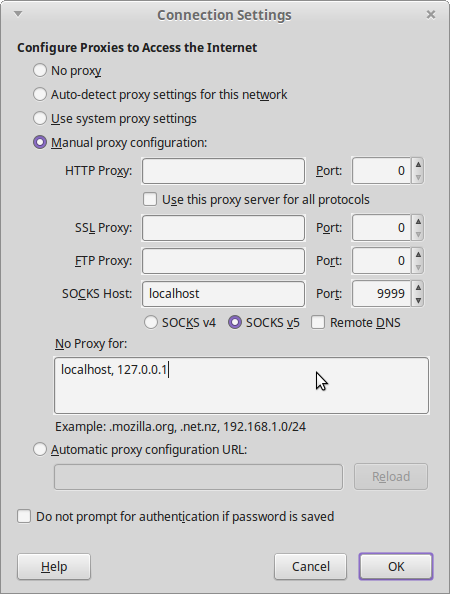
For browsers like Chrome you need to change your proxy settings for the system in order for this to work. We’ll use Firefox, this will leave the rest of the system as is.

  • Open Firefox
  • Enter Preferences
  • Select Advanced
  • Click “Settings…” where it says Connection (Configure how Firefox connects to the Internet)
  • Change the Proxy settings as below:

Firefox Proxy Settings SSH Now entering this site you can check you current IP address. Open Chrome or Safari and enter the very same site you will notice that each browser has its own IP address. Now in Firefox you can enter the local TV sites and watch any video as if you where in the country. Enjoy… /jima  

From DHCP to static IP on ubuntu server

When you got a server it’s actually kinda nice to know the address always stays the same 🙂 It’s actually not that hard to configure… when you know what to change of course, so here goes… I’m using vim as a text editor, but you should use the one you feel most comfortable with. Lets open the network interface configuration file.

sudo vim /etc/network/interfaces

Normally you got eth0 (I got enp3s0 on mine though) as your primary network interface and you should see something like this:

auto eth0
iface eth0 inet dhcp

Lets remove those lines and replace them with the following: (you should of course use your own values)

auto eth0
iface eth0 inet static
address 192.168.1.31
netmask 255.255.255.0
gateway 192.168.1.1
dns-nameservers 8.8.8.8

Now we need to change the DNS settings in the resolv.config file.

sudo vim /etc/resolv.conf

add the line

nameserver 8.8.8.8

Now you only have to restart the networking components:

sudo /etc/init.d/networking restart

There you go, just ping google.com and you should get a response if you put in the correct information. Cheers /jima

How to UnTar a Tar file

Ok then, since the first post was about using tar to compress files, I though it would be a good idea to know how to uncompress them as well. So, you have the file backup.tar and want to unpack it.

cd <destination path>
tar -xvf backup.tar.gz

or

tar -xvf backup.tar.gz -C <destination path>

Command explanation:

-x eXtract files and folders
-v Verbose mode. Not needed but it’s nice to see the files being extracted
-f File. The tar file to extract
-C Output Path. To where should the tar file be extracted

Cheers /jima

How to tar a complete folder

tarball Hi there, this is the very first post on this blog and I’m gonna start out with an easy one 🙂 How to TAR a complete folder under the command line on a Linux system like Ubuntu. Lets say you wanna tar the folder “stuff” and put the tar file in your /backup folder. The command would look something like this:

tar  -czvf /backup/stuff.tar.gz <path>/stuff

That’s it, but what does it all really mean? Lets break it down

-c Create, very much needed when creating a new compressed file
-z To compress it you need to specify what method to be used. This one means we want to GZip the file. Instead of -z you could use -j witch would compress the file even more (using bzip2) but would take longer time of course. Anyway, without it you won’t compress anything, only archive the files into one place.
-v Verbose, this lets you see what tar is doing but is not necessary to compress the folder
-f File, means that what ever comes after this command is the path and name of the new compressed file

Cheers, /jima